


![]()
![]()
![]()

![]()
![]()
It’s been a few months since my post about Hubitat, and I have not been too happy with it. The MQTT bridge works, but sometimes things get out of sync. For example, if I turn the power on the Zigbee bulb off and then on again, I can’t control the bulb through Home Assistant until I turn it on and off through Hubitat first. So I started my quest for an alternative. It costs almost nothing, so I decided to try out the CC2531 Zigbee stick.
Here’s what you will need:
- CC2531 | AliExpress
- Downloader cable for CC2531 | AliExpress
- Wemos D1 Mini | AliExpress
- Jumpers | AliExpress
- Arduino IDE
The easiest way to to program it is to use the CC Debugger tool. I don’t have one, but it looks pretty easy. But that thing costs another $15, so I decided to do it with a Wemos D1 Mini since I have a dozen of them laying around.
I also want to let you know that the range on this is VERY short. I’m talking maybe 20 feet. Since my server is in the basement, and my devices are on the other floors, I wasn’t able to get them to connect unless I put them in the basement. I actually had to go out and get an Ikea Trådfri outlet which acts as a repeater, and that’s its only purpose in life. I’ve got 2 of those outlets and a bunch of Sengled White and RGB bulbs. Everything works perfectly.
Here are the steps to program the CC2531:
- Load the sketch(code) onto the Wemos D1 Mini.
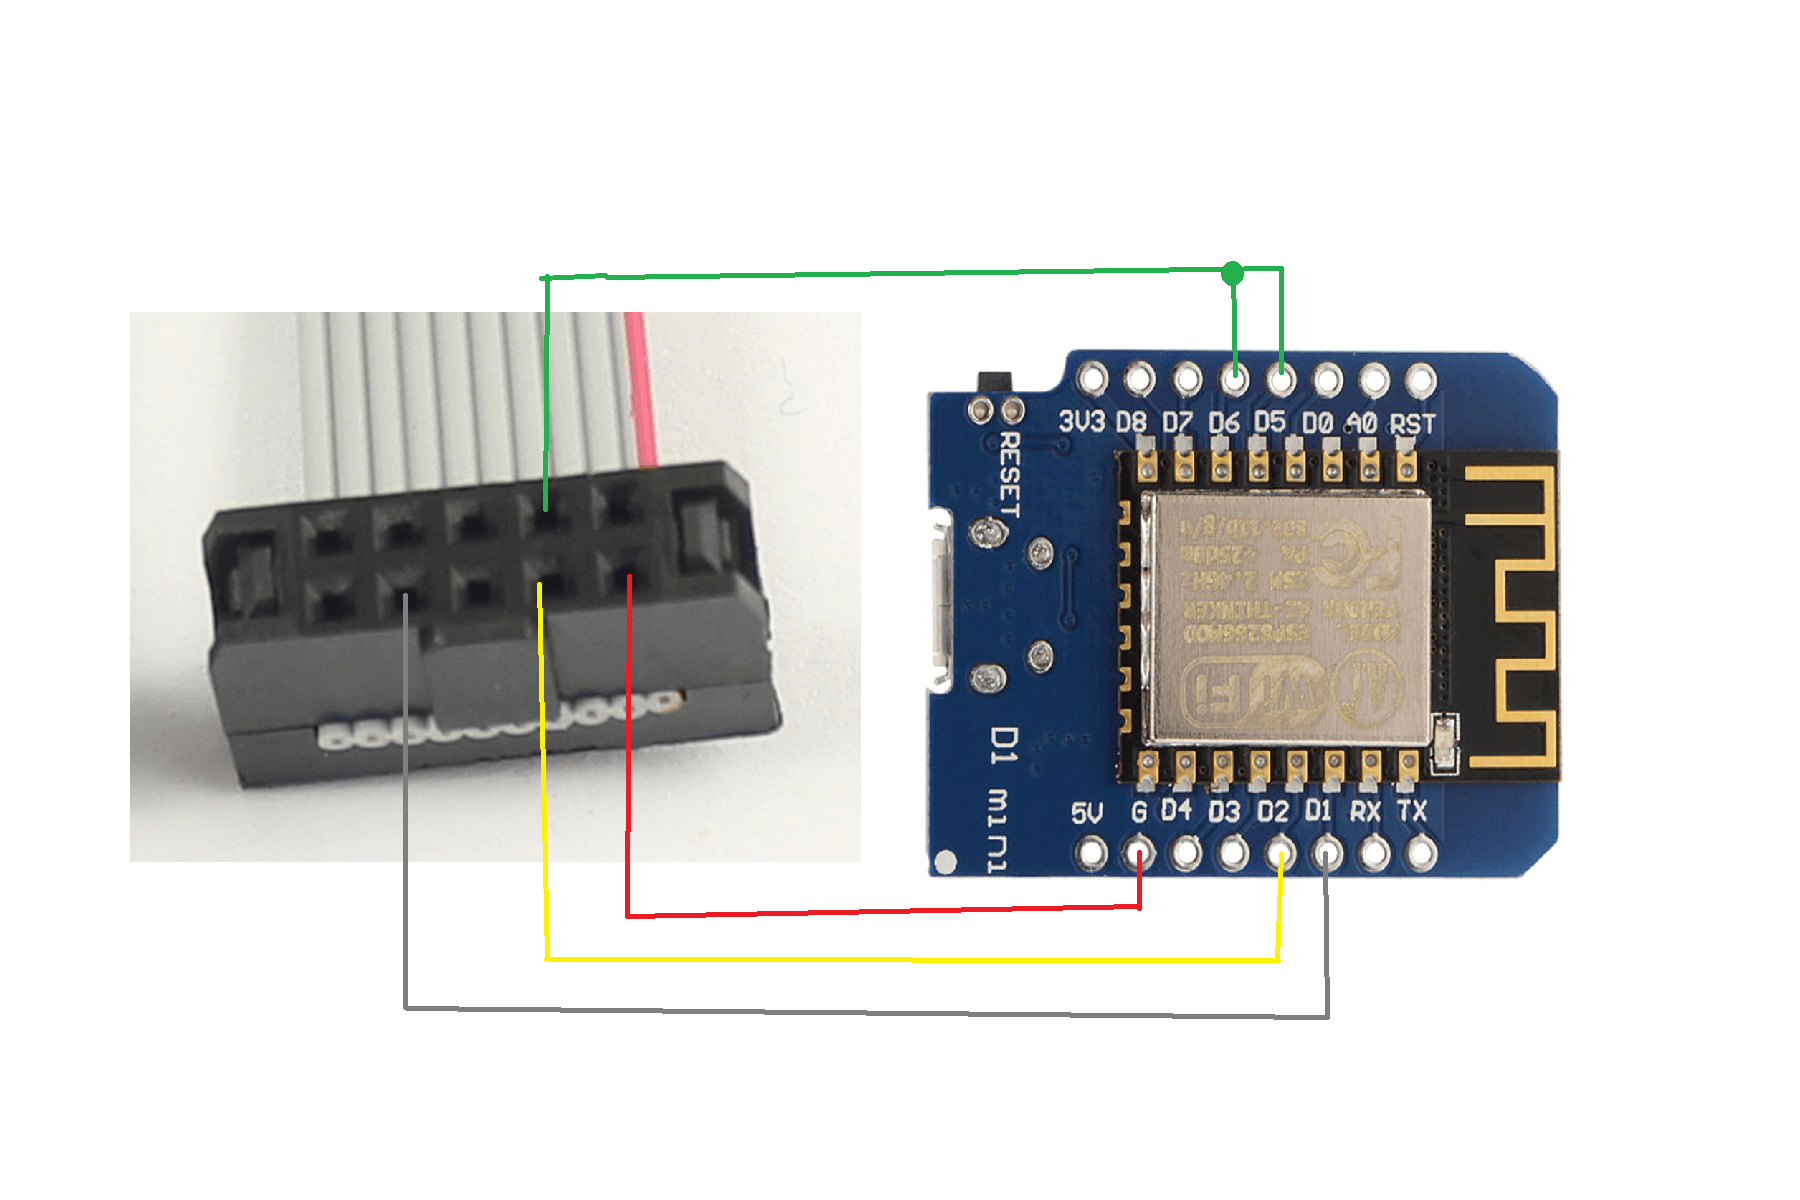
You can download it from HERE. Just go to that page and click ‘Clone or download’ and then ‘Download Zip’. Then extract the zip file. In Arduino IDE, open ‘\CCLib-master\Arduino\CCLib\Examples\CCLib_proxy\CCLib_proxy.ino’. Edit the section for pinouts so it looks like below, and then upload the code to the Wemos.int CC_RST = 5; int CC_DC = 4; int CC_DD_I = 14; int CC_DD_O = 12;
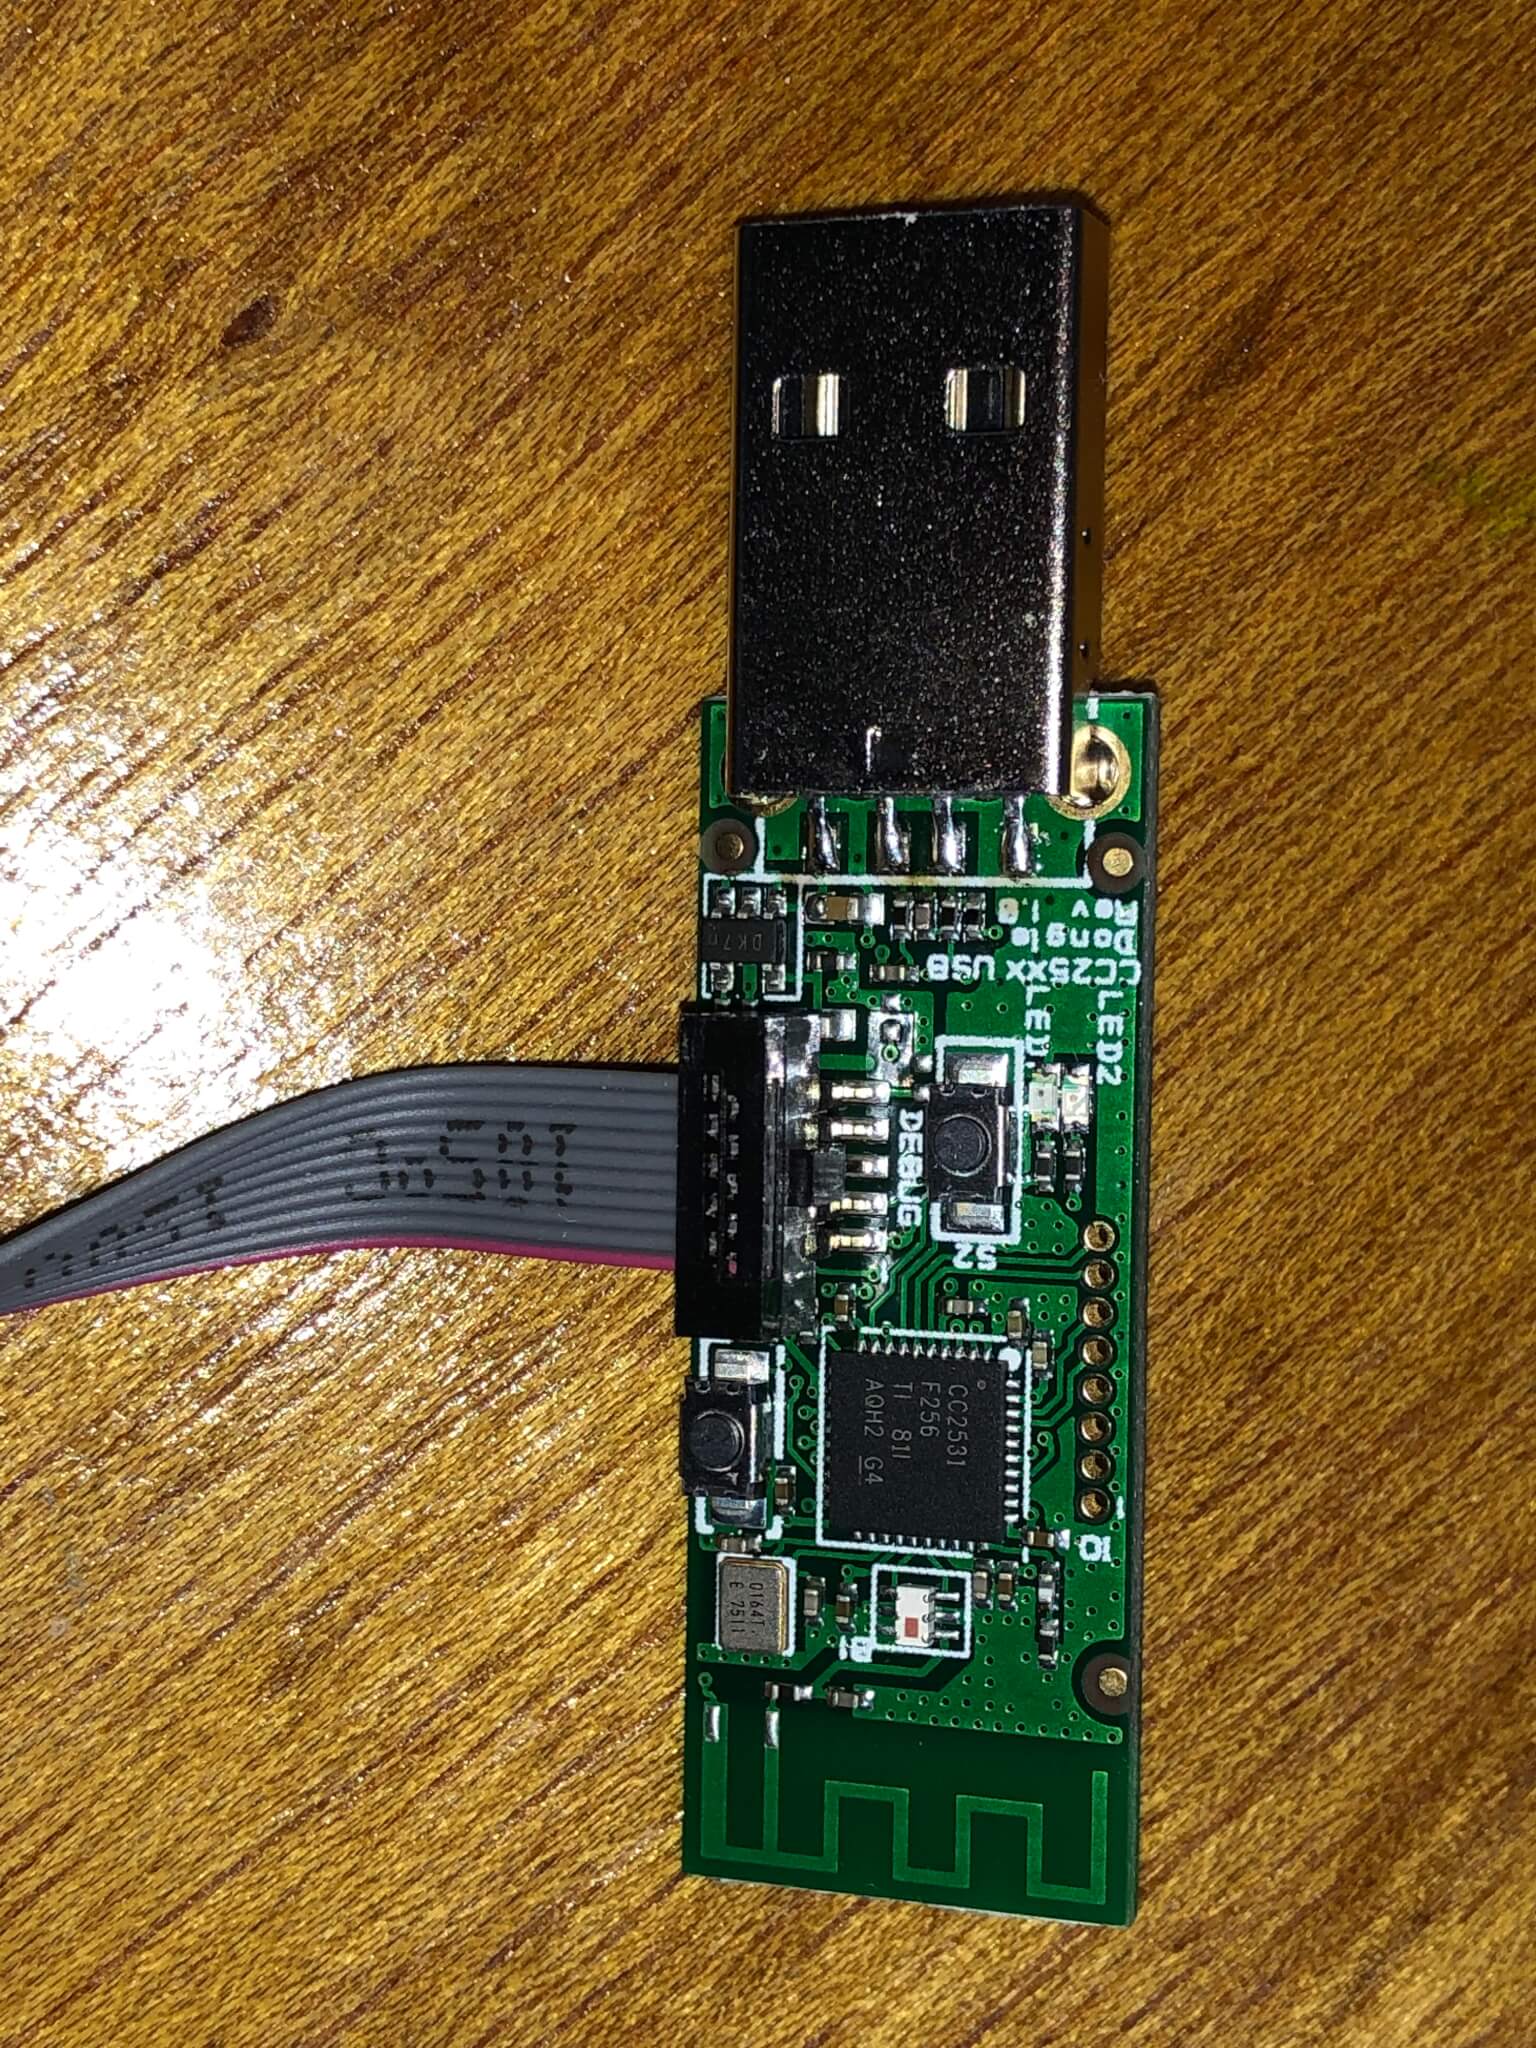
- Connect the Wemos/Downloader Cable/CC2531
The small connector on the downloader cable goes to the CC2531, with the red line on the cable being closest to the largest chip. There’s also a tiny ‘1’ that denotes pin 1, which corresponds to the red line on the cable.
The larger connector will be connected to the Wemos using 4 jumpers. And pins D5 and D6 on the Wemos also need to be jumpered to each other. I used the male + female headers, so I just bent the pins on the male side so they are touching. Below is a drawing of how it should be connected.Now, plug both the Wemos and the CC2531 into your computer.
- Download and install Python and PIP (a package manager for Python).
You can download Python HERE. And the instructions for installing PIP are HERE in case it didn’t get installed with python. Then run the command below to get the Python package for connecting to serial devices:python -m pip install pyserial - Upload the firmware to the CC2531
Download and save the firmware file located HERE. Firefox added a .txt extension to the filename when I downloaded it. So if that happens to you, you need to remove that extension. Save it to \CCLib-master\Python. Open a command prompt and ‘cd’ to the \CCLib-master\Python directory. Run the following command to make sure your connections are correct(Change COM3 to whatever COM port was assigned to your Wemos. You can check that in Device Manager in Windows):python cc_info.py -p COM3
If it worked, you should see INFO: Found a CC2531 chip on COM3 on the first line followed by a bunch of information about the CC2531. If not, then check your connections. Then run the following command to upload the firmware:
python cc_write_flash.py -e -p COM3 --in=CC2531ZNP-Pro-Secure_LinkKeyJoin_mod.hex
It will ask you if you want to continue, press ‘y’ and then ‘enter’. It will start uploading the firmware. enjoy the break, because this will take a few hours. After this is done, the Zigbee stick is ready for use.
I am currently using Hass.io in docker running on Linux Mint. So I just installed the zigbee2mqtt add-on. I used the following config on the add-on screen. Everything is the default, except for ‘serial_port’. Unfortunately, you can’t access the CC2531 using /dev/serial/by-id/devicename. It’s only accessible via /dev/tty*, which is assigned at boot. So, especially if you have more than one USB device, that name can change when you restart the computer. the /dev/serial/by-id path will always be the same. So there might be times where after a reboot, you will need to change that name in the config. :
{
  "data_path": "/share/zigbee2mqtt",
  "homeassistant": true,
  "permit_join": false,
  "mqtt_base_topic": "zigbee2mqtt",
  "mqtt_server": "mqtt://homeassistant",
  "serial_port": "/dev/ttyACM0"
  "cache_state": true
}
After you do that, I HIGHLY recommend you follow the steps towards the end of the add-on’s readme that contains some config for Home Assistant. That will allow you to add a small panel that presents a switch that allows you to enable pairing for 5 minutes, and displays the timer for that. It also displays the status of the Zigbee bridge.
I hope this helps someone out. Let me know if you need any help with it.


